If your Microsoft Teams camera not working, don’t panic. With some dedicated troubleshooting, you can get your webcam up and running again for Teams video calls and meetings.
In this guide, we’ll outline the most common fixes for a Microsoft Teams camera not being detected or showing video.
Fix Microsoft Teams camera not working
1. Restart Your Device
If you’re facing issues with your Microsoft Teams camera not working, one of the simplest and most effective troubleshooting steps is to restart your device. Restarting can help resolve various software glitches, refresh system settings, and clear temporary files that may be causing conflicts. In this article, we’ll guide you through the process of restarting your device to fix camera-related problems in Microsoft Teams.
Before anything else, a simple restart often resolves minor glitches preventing Team from accessing your camera. Shut down and restart your computer or mobile device, then try Teams again.
2. Check App Permissions
To troubleshoot and resolve the issue of your Microsoft Teams camera not working, one important step is to check the app permissions. Sometimes, the camera may not function properly due to incorrect or restricted permissions. In this article, we’ll walk you through the process of reviewing and adjusting the app permissions for Microsoft Teams, enabling you to regain control of your camera and ensure it functions seamlessly within the application.

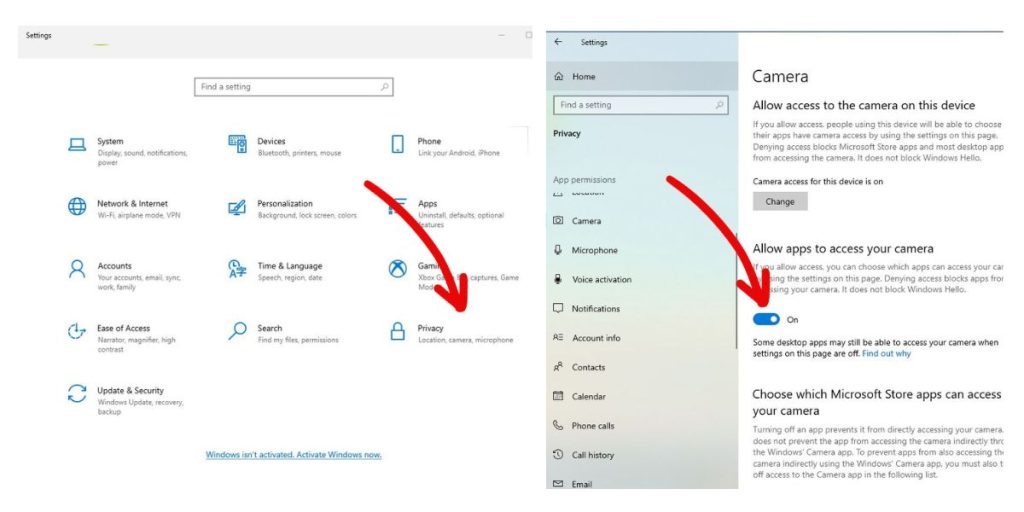
Teams needs explicit access rights to use your camera. Confirm it’s allowed:
- Go to Settings > Privacy > Camera
- Ensure the toggle is ON for Allow Desktop Apps to Access Camera
- Click Teams and make sure Camera access is enabled
- If disabled, enable camera access permissions for Teams in your device privacy settings.
3. Disable Other Cameras
If you have multiple cameras connected, Teams may be trying to use the wrong one. Temporarily disable other webcams in Device Manager and reconnect only the camera you want to use.
4. Update Teams
An outdated version of Teams could explain the camera issues. Update to the latest:
- In Teams, click your profile picture > Check for Updates
- Install any pending updates and restart Teams.
- Updating to the newest version often resolves camera glitches after Windows or Teams updates.
5. Reinstall Teams

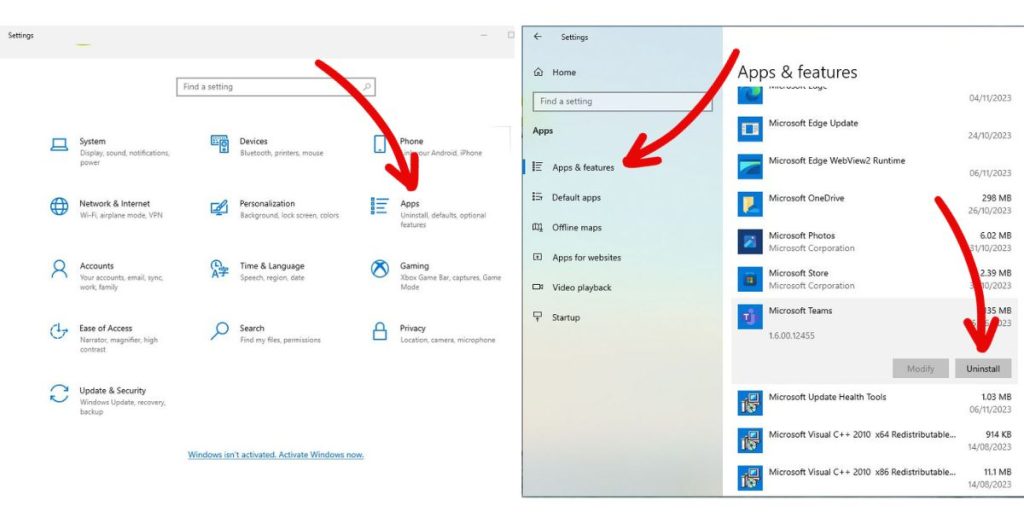
If your camera still isn’t working, uninstall and reinstall Teams:
- Go to Settings > Apps > Apps & Features
- Find Teams, click the three dots and select Uninstall
- Download Teams again from the Microsoft Store and reinstall. This replaces any corrupted files that may be causing camera problems in Teams.
6. Update Camera Drivers

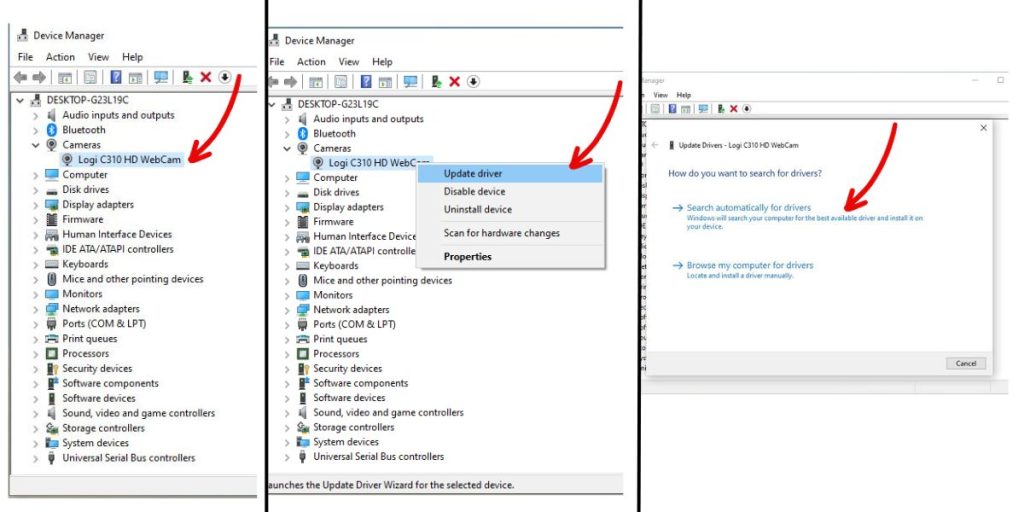
Outdated, broken or missing drivers can prevent Teams from accessing your webcam.
- Open Device Manager > Camera > Your Camera
- Right click and select Update Driver > Search Automatically
- Restart your device after installing driver updates. Modern drivers ensure maximum compatibility with Teams.
7. Adjust Video Settings in Teams
Teams may have the wrong camera selected or need adjusted video settings.
- In Teams, click your profile picture > Settings > Devices
- Click Camera and choose the correct webcam
- Adjust resolution, framerate, etc to optimize performance
- Double check Teams video settings match your camera’s capabilities.
8. Use the Teams Web Version
As a workaround, access Teams through a web browser and enable camera access when prompted. This isolates any possible app issues.
If the camera works fine in the web version, a reinstall of the desktop app should resolve problems.
9. Check Hardware and Connections
For recurring camera problems, inspect your webcam and connections:
- Reseat the USB cable on both ends
- Test the camera with other apps to isolate the issue
- Try an alternate USB port
- Replace the webcam if it’s non-functional. Faulty hardware like a broken webcam can prevent Teams access despite correct software settings.