Experiencing Windows 10 no Wi-Fi issues can be a frustrating ordeal, hindering your productivity and connectivity. In this comprehensive guide, we will explore effective solutions to troubleshoot and fix the Wi-Fi problems in Windows 10. Whether you’re encountering connectivity errors, limited or no network access, or missing Wi-Fi options, our step-by-step methods will help you regain a stable and reliable connection.
1. Fix Windows 10 No Wi-Fi: Enable Wi-Fi Adapter
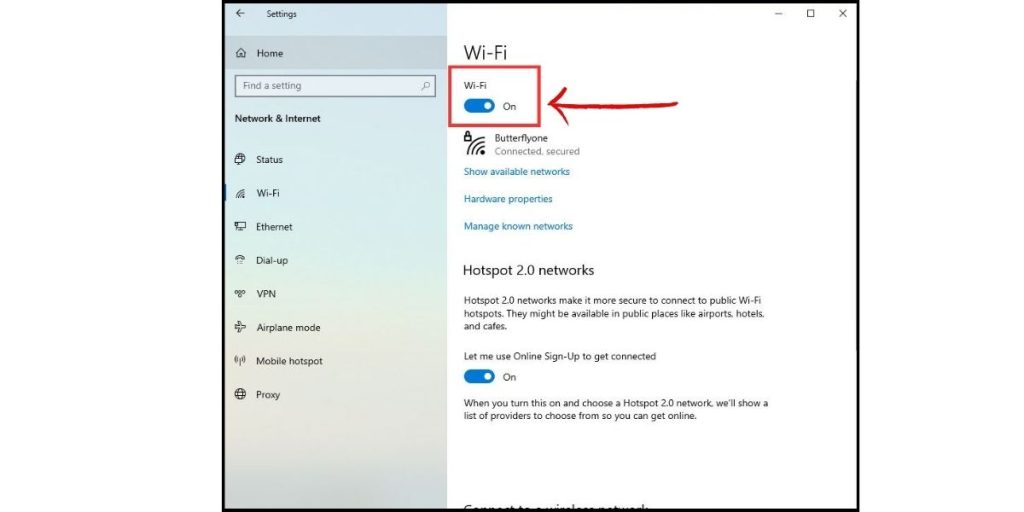
First, check Windows hasn’t disabled your Wi-Fi adapter. The Wi-Fi adapter is responsible for connecting your device to wireless networks, and if it’s disabled or not functioning correctly, you may experience a lack of Wi-Fi connectivity.

Go to Network Settings and confirm Wi-Fi is toggled On. Also check for a physical Wi-Fi toggle key on your device.
2. Update Network Drivers
Outdated or faulty Wi-Fi drivers can cause connectivity issues. If you’re experiencing the frustrating issue of having no Wi-Fi on your Windows 10 device, updating your network drivers might be the solution you’re looking for. Network drivers play a crucial role in establishing and maintaining a stable wireless connection, and outdated or faulty drivers can often lead to connectivity problems. Updating your network drivers, ensures compatibility with the latest Windows 10 updates and patches, as well as resolve any known issues or bugs.

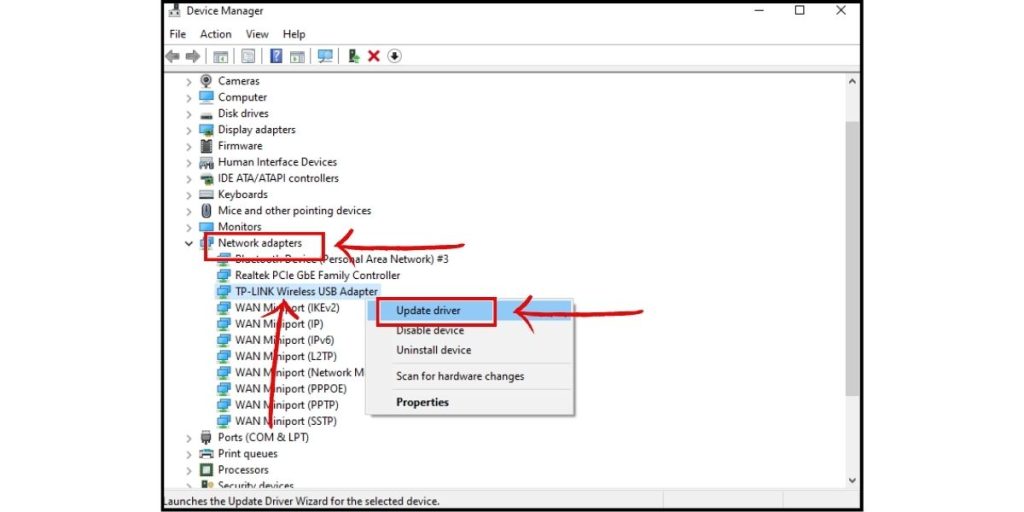
Update your drivers:
- Open Device Manager.
- Under Network Adapters, right-click your Wi-Fi driver > Update Driver.
Or use a tool like Driver Easy to handle driver updates automatically.
3. Restart Router and Modem
Router or modem issues can prevent Wi-Fi networks displaying. If you’re facing the frustrating issue of having Windows 10 No Wi-Fi, one of the first troubleshooting steps you should consider is restarting your router and modem. Oftentimes, network connectivity problems can be attributed to temporary glitches or conflicts within the networking equipment. Restarting your router and modem can help clear any such issues and reestablish a stable wireless connection.
Turn off and unplug your router and modem, wait 30 seconds, then power them back on.
On your PC, reconnect to Wi-Fi and see if your network appears.
4. Toggle On SSID Broadcast
Disabling SSID broadcast hides your Wi-Fi network. The name of your wireless network is called the SSID (Service Set Identifier), and sometimes, disabling the broadcast can lead to connectivity issues. By enabling the SSID broadcast, you allow your Windows 10 computer to detect and connect to the network.
Log into your router’s setup page and ensure SSID broadcast is enabled.
5. Switch Wi-Fi Frequency Band
Your router and device need matching Wi-Fi bands. Switching the Wi-Fi frequency band can be an effective troubleshooting step. Wi-Fi networks operate on different frequency bands, such as 2.4 GHz and 5 GHz, each with its own advantages and limitations. Sometimes, network congestion or interference can cause connectivity problems, and switching to a less congested frequency band can help restore Wi-Fi functionality.
Check your router is dual-band or set to the same 2.4GHz/5GHz band as your network adapter.
6. Move Router Away From Interference
Nearby devices like phones and microwaves can interfere with Wi-Fi signals. Physical obstructions or electronic devices operating on similar frequencies can disrupt the wireless signal and lead to connectivity problems. In such cases, moving your router away from potential sources of interference can help restore a stable Wi-Fi connection.
If problem started after new device, move the router away from it.
7. Run Network Troubleshooter
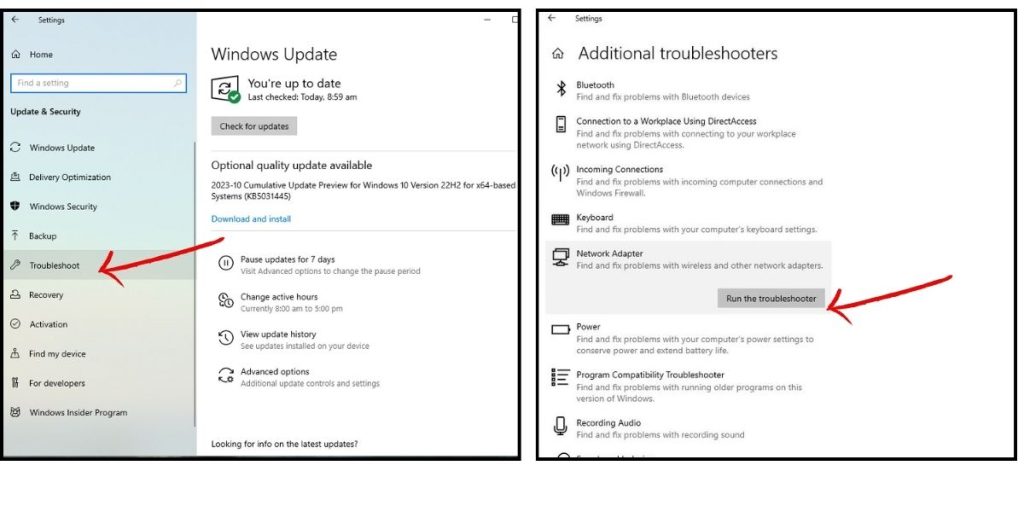
Windows includes a network troubleshooter that can diagnose Wi-Fi issues such as Windows 10 No Wi-Fi issue. The Network Troubleshooter is a powerful tool that automatically detects and fix common network issues, including Wi-Fi problems. It scans your system, identifies potential problems, and provides step-by-step guidance to resolve them.

Go to Settings >Update & Security> Troubleshoot > Additional Troubleshooters then run the network adapter troubleshooter. Follow the steps to fix any found issues.
8. Try an Ethernet Connection
If you still can’t see or connect to any Wi-Fi, use Ethernet to access the internet and diagnose further problems.
While Wi-Fi provides wireless convenience, it can be susceptible to interference and connectivity issues. By connecting your Windows 10 computer directly to a router or modem using Ethernet cable, you can bypass potential Wi-Fi problems and establish a reliable wired connection.
9. Reset Network Settings
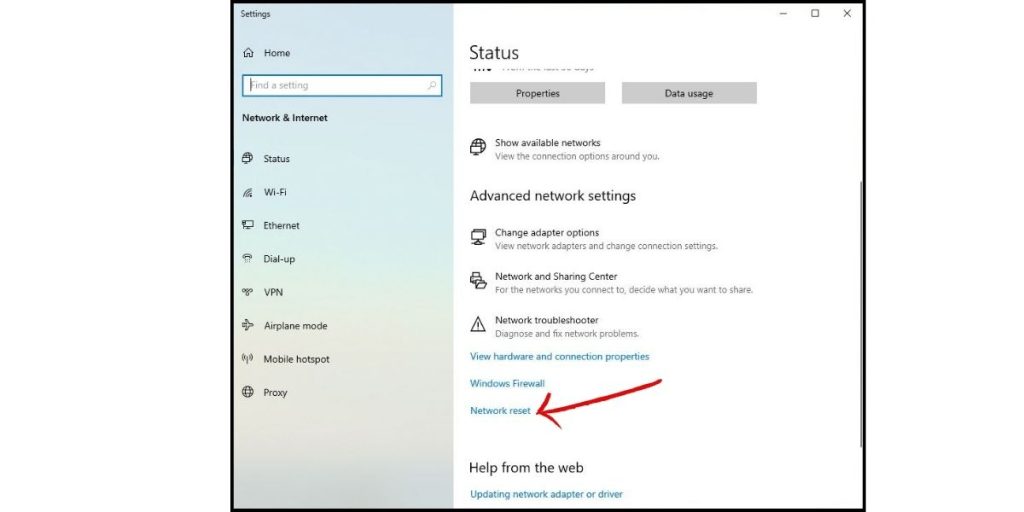
As a last resort, resetting all network settings may resolve Windows 10 No Wi-Fi issue by clearing any corrupted settings. Over time, network configurations and settings can become corrupted or misconfigured, leading to connectivity issues. Resetting the network settings to their default state eliminates any potential configuration problems and restore the Wi-Fi functionality on your Windows 10 computer.

Go to Network Status > Network Reset. This will forget all Wi-Fi passwords so note them down first.
With these troubleshooting steps, you should be able to get your missing Wi-Fi networks showing again in Windows 10. Just work through each solution systematically until you restore your connectivity.