Remote Desktop is a feature in Windows 10 which when activated on your computer allows you to connect to it using a different computer from another location. This makes it easy for you to access your home computer for example from your work computer and copy a document which you need. All versions of Windows 10 can support remote connections but only Windows 10 Professional and Windows 10 Enterprise can be configured to accept remote connections. If you use any of these two versions then here’s how you can set up remote desktop on windows 10.
Enable Remote Desktop On Windows 10
The Remote Desktop feature is disabled by default on Windows 10 as this isn’t a feature that is usually used by most computer users. If someone you know requires access to your computer or if a technician needs to assist you with certain computer related issues then you can activate this feature. If a third party program such as TeamViewer or Anydesk will be used for the remote connection then you will not need to enable the remote desktop.
Time needed: 2 minutes.
Turn On Remote Desktop Feature Manually
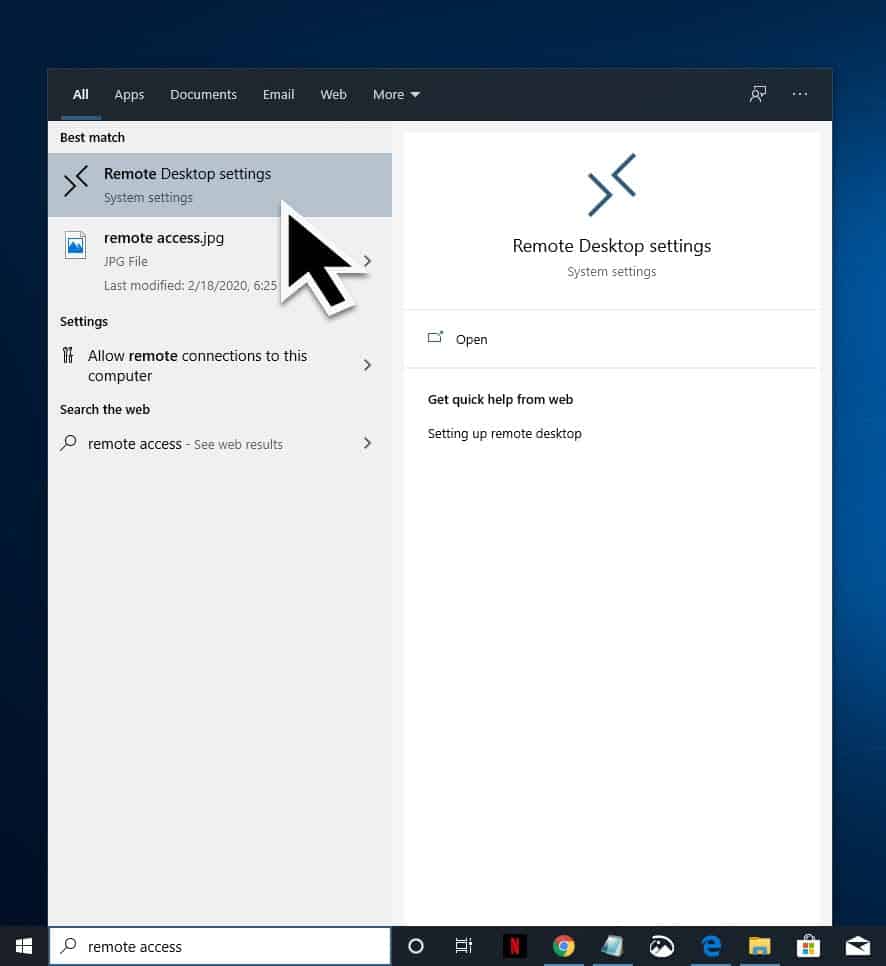
- Type remote access on the search bar
This is located on the lower right side of the screen just after the Start button.

- Click on the Remote Desktop Setting app
This app will appear on the selection list.

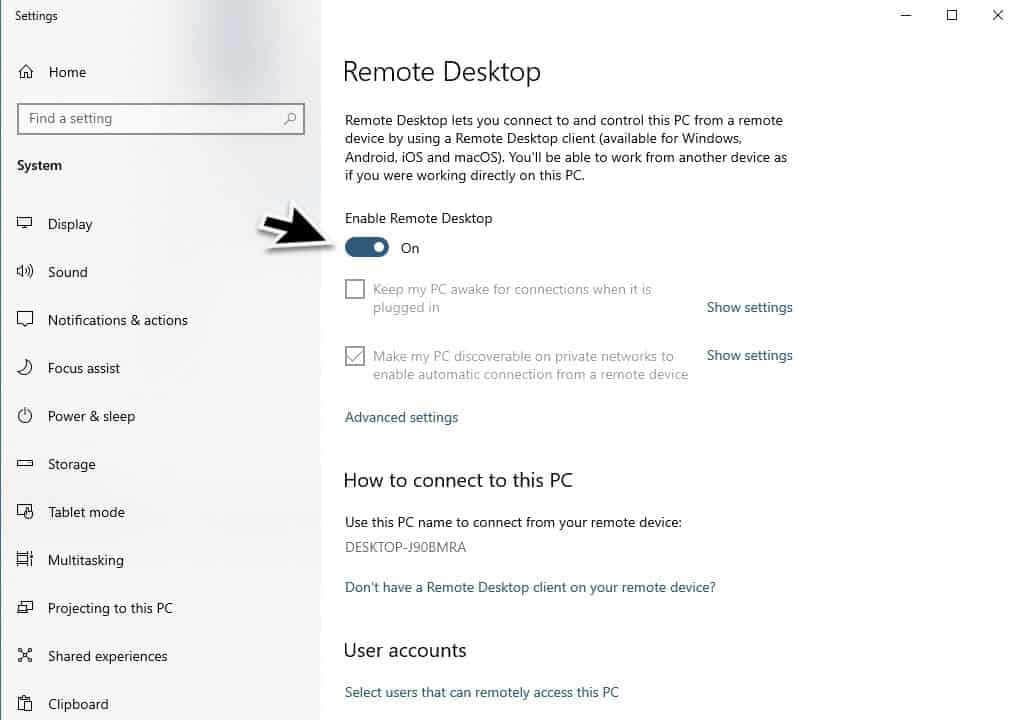
- Turn the enable Remote Desktop switch on then click on the confirm button.
This will enable you to connect to and control the computer from a remote device.

You can also set up remote desktop on Windows 10 with the following steps.
- Click on the Start button. This is located on the lower left side of the screen.
- Click on Settings. Its icon is shaped like a gear.
- Click on System. This is usually the first choice on the upper left side of the new window that appears.
- Click on Remote Desktop. This is located on the left pane.
- Use the slider to enable Remote Desktop. This will turn on the Remote Desktop feature
Setting up the Remote Desktop
Once you have turned on this feature it’s time to set it up properly. Make sure to copy the PC name as indicated on the Remote Desktop window as this will be needed by the remote device to connect to your computer. It is also recommended to keep the PC awake and discoverable to enable connections.
Connecting to another computer using Remote Desktop
Once the computer you want to connect to has enabled the Remote Desktop feature then you can connect to it from a different computer.
- On a local Windows 10 PC type Remote Desktop Connection in the search bar.
- Select the Remote Desktop Connection that appears.
- In Remote Desktop Connection, type the name of the PC you want to connect to and then select Connect.
Allow Remote Desktop connections through a Windows Firewall
If you have an issue using the Remote Desktop connection then it might be blocked by the firewall. You will need to make sure that the port for Remote Desktop (usually 3389) is open.
- Click on Start
- Click on Settings
- Click on Update and Security
- Click on Windows Security
- Click on Firewall & Network Protection
- Click on Allow an app through firewall
- Click on Change settings
- Check the box ( public and private) next to Remote Desktop.
- Click OK


