Are you facing the frustrating issue of Skype not opening? Don’t worry, we’ve got you covered! In this comprehensive guide, we’ll provide you with 10 effective troubleshooting methods to resolve the problem and get Skype up and running again. From checking your internet connection to reinstalling the application, we’ll guide you through step-by-step instructions to ensure a smooth and hassle-free Skype experience. Say goodbye to the frustration of Skype not opening and get back to connecting with friends, family, and colleagues in no time.
Fix Skype Not Opening in Windows
1. Restart Your Computer
Before anything else, a simple restart often resolves minor software glitches preventing Skype from opening properly. Shut down and restart your computer, then try launching Skype again. This refreshes the entire operating system and fixes many startup issues.
2 . Check App Permissions
Skype needs access to your microphone and webcam to function. Make sure permissions are enabled:
- Go to Settings > Privacy > Microphone and Camera
- Confirm the toggles are ON for Allow access to microphone/camera
- Click Skype and ensure the toggles are enabled under App Permissions
Granting access rights to your mic and camera allows Skype to open without restrictions.
3. Update Skype
An outdated version of Skype can cause launching problems. Update to the latest:
- Open Microsoft Store
- Click the Profile icon > Downloads and updates
- Click Get updates to install any pending Skype updates
Updating to the newest Skype version resolves many launch issues after Windows updates or software changes.
4. Run Skype as Administrator
For some users, launching Skype as an admin is required for it to open. To do this:
- Right click the Skype app icon
- Select Run as administrator
- Click Yes at the prompt
- Skype should then open
Running as admin overrides some restrictions that may be blocking Skype from launching normally.
5. Perform Clean Boot
Other apps running in the background can sometimes interfere with Skype opening. Doing a clean boot isolates the problem:

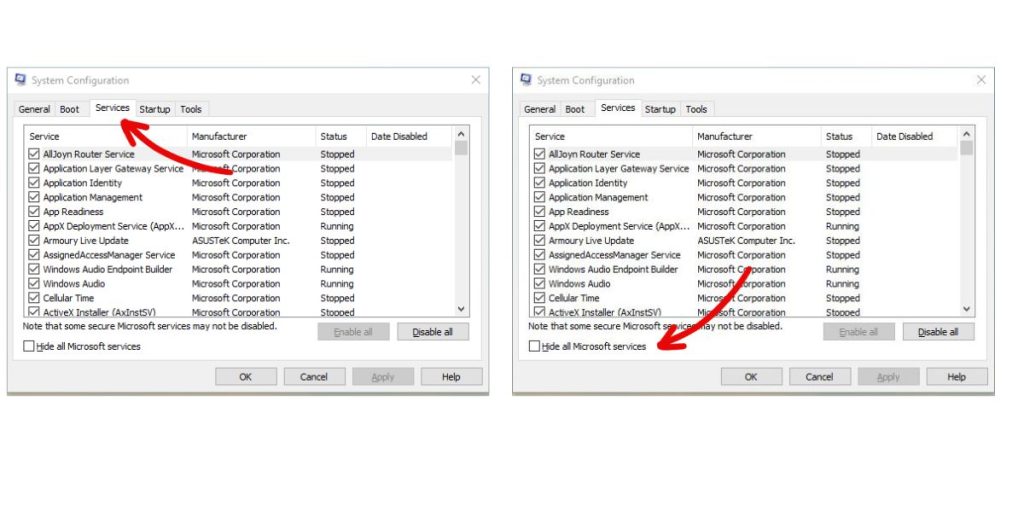
- Type “msconfig” into the Windows search bar
- Go to the Services tab and check “Hide Microsoft services”
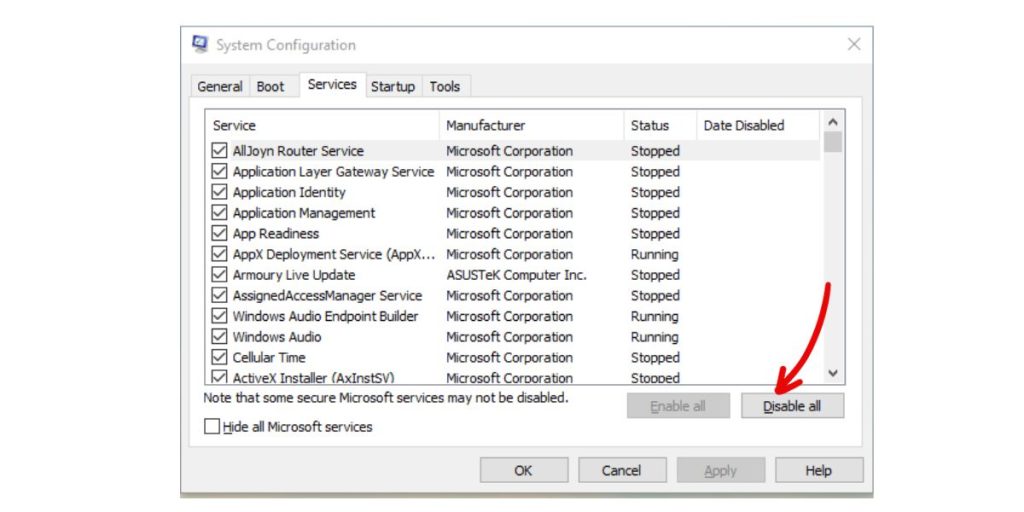
- Click Disable all, apply and restart your PC

With only essential apps enabled, try launching Skype now. If it works, re-enable startup items individually until you find the conflicting program.
6. Reinstall Skype
If Skype still won’t launch, uninstall completely and reinstall the app from the Microsoft Store. This replaces any damaged framework files needed for Skype to start.
- Go to Settings > Apps > Apps & features
- Find Skype, click the three dots and select Uninstall
- Open the Microsoft Store and reinstall the latest Skype
7. Check Network Settings
Connection issues can also prevent Skype from opening. Reset network settings to defaults:
- Go to Settings > Network & Internet > Status > Network reset
- Click Reset Now to clear network configurations
After rebooting, Skype should be able to establish a fresh network connection and launch normally.
8. Scan for Malware
Viruses or malware disrupting critical system processes can block apps like Skype from opening. Run a full system scan to remove any infections.
Install reputable antivirus software if you don’t have any, perform a full scan, delete anything dangerous found, and restart your computer. This often resolves malware-related launch failures.
9. Refresh Windows
As a last resort, you can refresh your Windows installation to fix corrupt files or registry issues causing Skype problems, without erasing personal files.
Go to Settings > Update & recovery > Recovery > Get started under Refresh Windows. Follow the prompts to reinstall Windows while retaining your data.
After the refresh, Skype should be able to launch without conflicts from damaged Windows files.