GTA 5 Launcher Not Working? 5 Proven Solutions to Fix It
Have you tried launching GTA 5 only to find the launcher isn’t working? This frustrating issue prevents you from playing the game.
Fortunately, there are several proven techniques you can try to get the GTA 5 launcher working again so you can enter Los Santos.
Follow these 5 simple steps to troubleshoot and resolve the GTA 5 Launcher not working problem:
1. Run the Launcher as Administrator
One potential cause of the launcher not functioning is a permissions issue. Fix this by ensuring the launcher runs with admin rights.
Here’s how:
- Close GTA 5, Steam, and the Rockstar Launcher completely.
- Right click the Steam shortcut and select “Run as Administrator”.
- Also open the Rockstar Launcher as an administrator.
- Relaunch GTA 5 through Steam and see if that fixes it.
Running the launchers as admin often resolves compatibility problems causing this error.
2. Update Graphics Drivers
Outdated graphics drivers frequently lead to games not opening properly. Updating to the latest driver optimizes performance and compatibility.
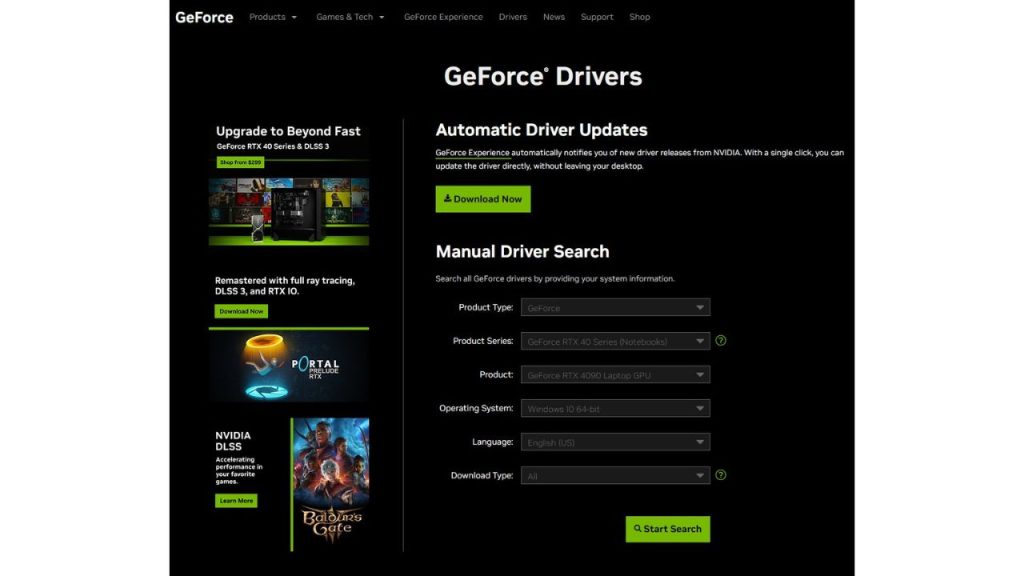
You can update drivers manually or automatically:
Manually
- Go to Nvidia or AMD’s website.
- Find the latest driver for your Windows version.
- Download and install it by following the on-screen prompts.
Automatically (Easier)
- Download and install Driver Easy.
- Run it and click “Scan Now”.
- Click “Update All” to automatically download and install the correct drivers for your hardware.
With updated drivers, retry launching GTA 5 to see if it’s fixed.
3. Verify Integrity of Game Files
Corrupted GTA 5 files can prevent the launcher from working. Steam’s file verification checks for issues and re-downloads any damaged files.
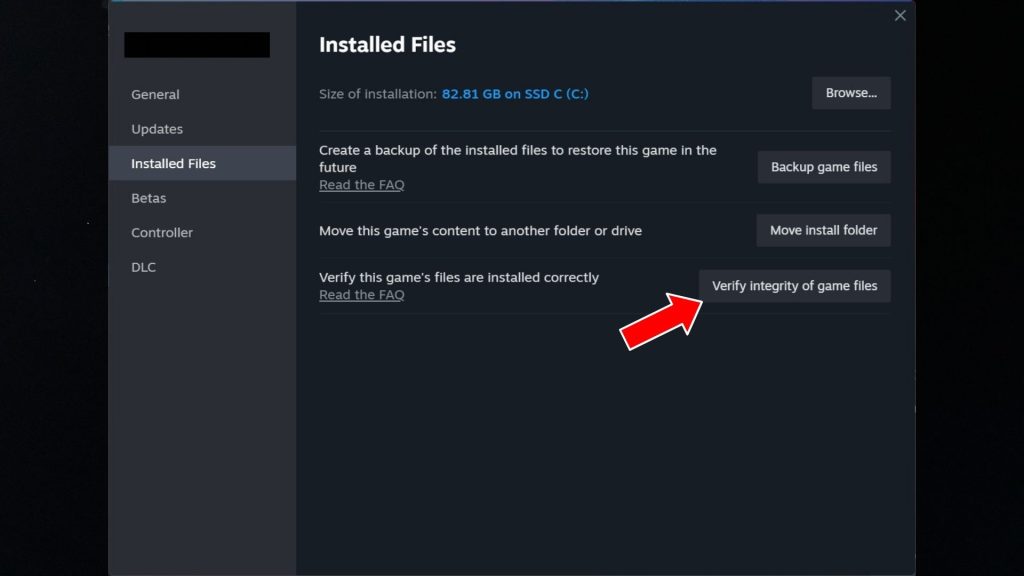
- Open Steam and go to your game library.
- Right click GTA 5 and select Properties.
- Go to Installed Files > Verify Integrity of Game Files.
- Steam will scan and replace any problematic files.
Once complete, launch GTA 5 again and check if the launcher works now.
4. Reinstall Social Club
The Rockstar Social Club app is required for GTA 5. Reinstalling it can resolve conflicts causing launch problems.
- Uninstall Social Club via Control Panel > Programs.
- Delete any Social Club folders in Documents/Rockstar Games.
- Download and reinstall Social Club from this link.
- Log into Social Club and try starting GTA 5 again.
A clean Social Club installation eliminates issues that may have been preventing the launcher from opening.
5. Run in Compatibility Mode as Admin
Compatibility settings help run older programs properly on newer systems. Combined with admin rights, this can get the launcher functioning again.
- Right click GTA5.exe and go to Properties > Compatibility.
- Enable “Run as Administrator” and set compatibility to Windows 7.
- Click Apply and OK.
Now when you run GTA 5, it should launch with the proper permissions and compatibility to get the launcher working once more.
Bonus: Opt Out of Steam Beta
If you participate in Steam’s beta program, instability and bugs can sometimes break games. Opting out may resolve GTA 5 launcher problems.
- In Steam, go to Settings > Account.
- Under Beta participation, click Change.
- Select “Opt out of all beta programs”.
- Restart Steam and try launching GTA 5 again.
The standard stable Steam client may provide the stability needed for the launcher to work properly.
Fix Permissions Issues with Safe Mode
Software conflicts in the background can interfere with games launching. Booting in safe mode minimizes this, isolating the problem.
- In msconfig, go to the Services tab.
- Check “Hide Microsoft services” and click “Disable all”.
- Go to the Startup tab and disable all entries. Click OK.
- Restart your PC in safe mode.
- Attempt to launch GTA 5 and see if the launcher works now.
With other programs disabled, you can determine if a conflict is preventing the Rockstar launcher from functioning correctly.