Fix League of Legends FPS Drop: The Ultimate Guide
League of Legends FPS Drop? League of Legends (LoL) is one of the most popular multiplayer online battle arena (MOBA) games. With over 115 million monthly players, it’s no surprise that League ranks among the top eSports games in the world.
But like any online game, League is not without its technical issues. One of the most common problems players face is random FPS drops during matches. This can severely impact your gameplay and ruin the overall experience.
If you are facing FPS drops in League of Legends, this comprehensive guide will help you diagnose and fix the issue once and for all.
What Causes FPS Drops in League of Legends?
Before jumping into solutions, it’s important to understand what’s causing FPS drops in the first place. Here are some of the common culprits:
- Outdated Graphics Drivers: Old graphics drivers can cause compatibility issues resulting in lag and FPS drops. Always keep your GPU drivers updated.
- Overheating: If your CPU or GPU overheats, it will throttle performance leading to FPS fluctuations. Make sure your PC has adequate cooling.
- Too Many Background Apps: Apps running in the background eat up system resources needed for optimal League performance. Close other resource-heavy apps before playing.
- Game Files Corruption: Corrupt game files or missing assets can severely impact in-game performance. Run the repair tool to fix file issues.
- Improper In-Game Settings: Settings like Shadow Quality set too high can overwork your hardware and cause FPS drops. Optimize in-game video settings.
- Hardware Limitations: If your PC lacks the minimum system requirements, you will experience lag and FPS drops in League. Upgrade your rig if needed.
7 Ways to Fix FPS Drops in League of Legends
Now let’s discuss step-by-step methods to boost FPS and eliminate lag in League:
1. Update Your Graphics Drivers
Outdated graphics drivers are a leading cause of FPS drops in games. Here’s how to update GPU drivers:
- Open Device Manager > Display Adapters > Right-click your GPU > Select Update Driver
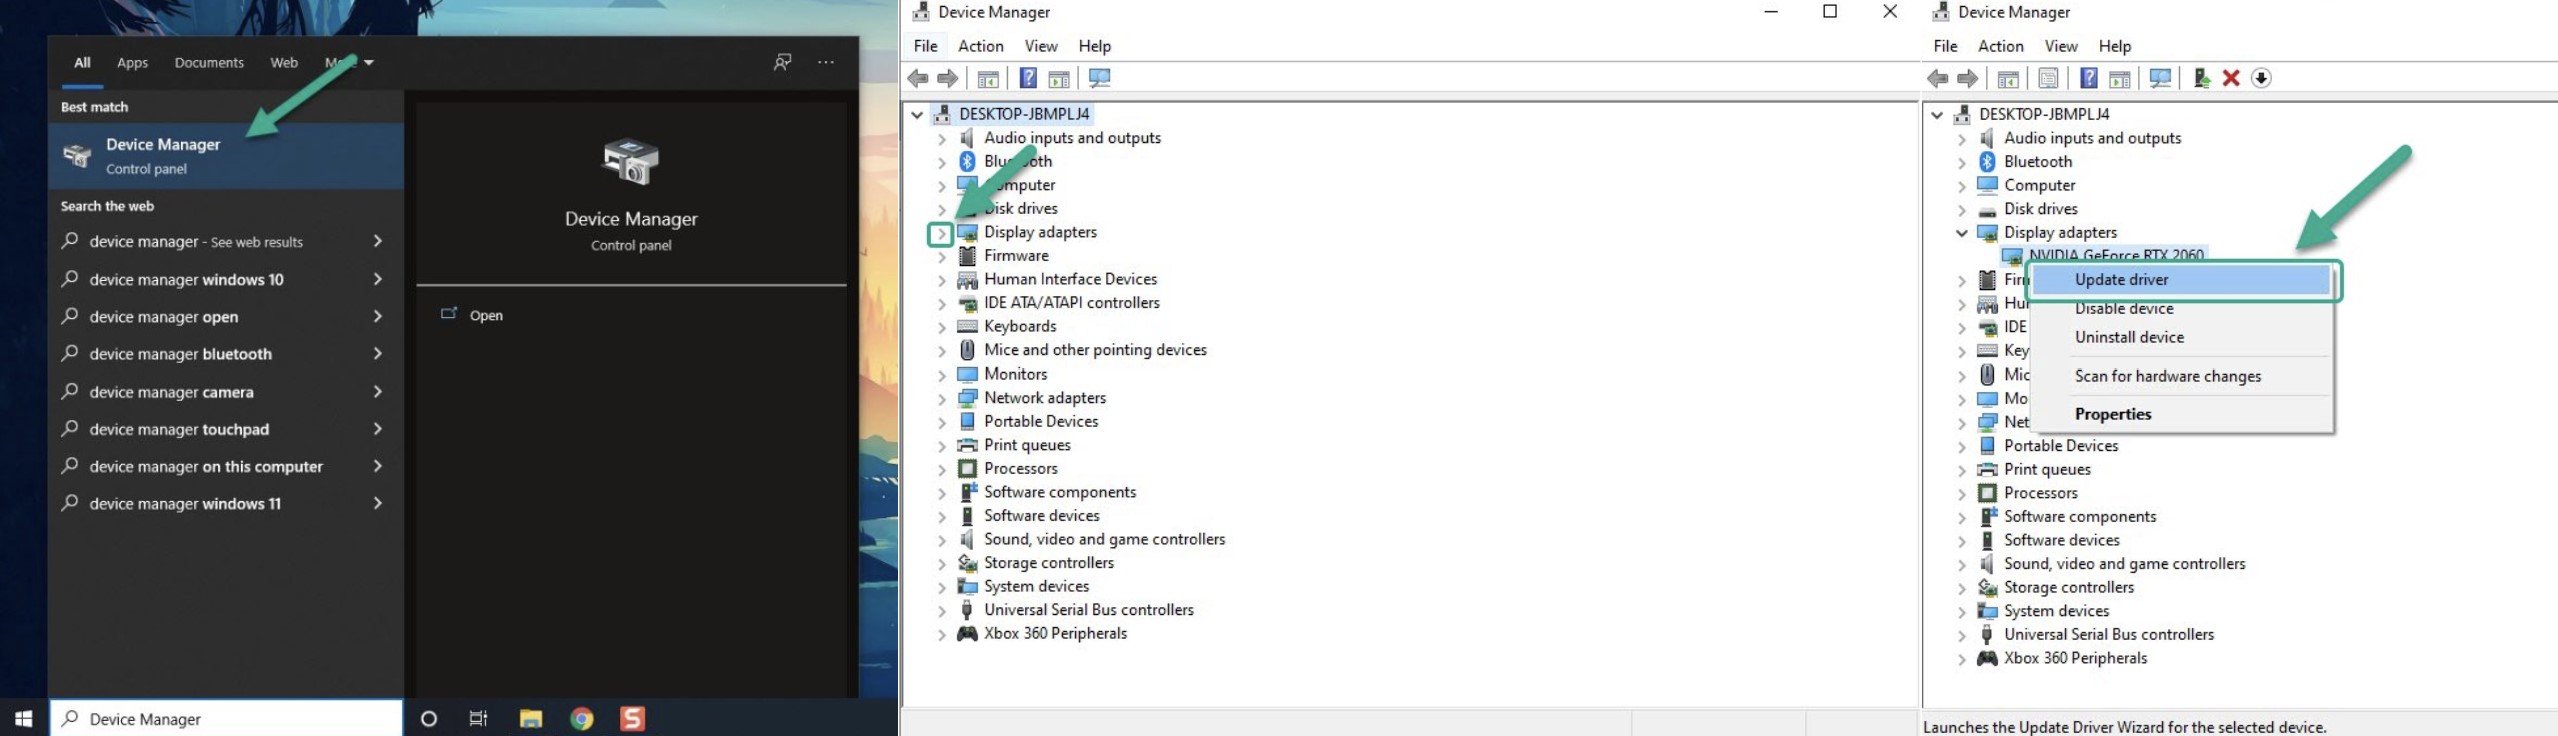
- Tick “Search automatically for updated driver software”
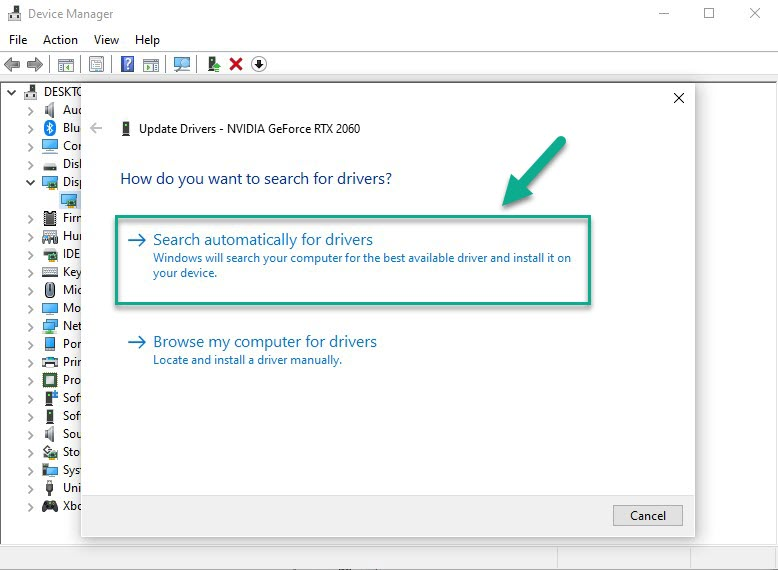
- Reboot your PC once the update completes
You can also visit your GPU manufacturer’s website (Nvidia, AMD, Intel) and download the latest driver manually.
Updating to the newest graphics driver optimizes League performance and resolves FPS issues.
2. Lower In-Game Video Settings
League graphics settings directly impact FPS. Lowering them reduces stress on your hardware. Follow these steps:
- In League Client, Press Settings > General > Enable Low Spec Mode then select Done
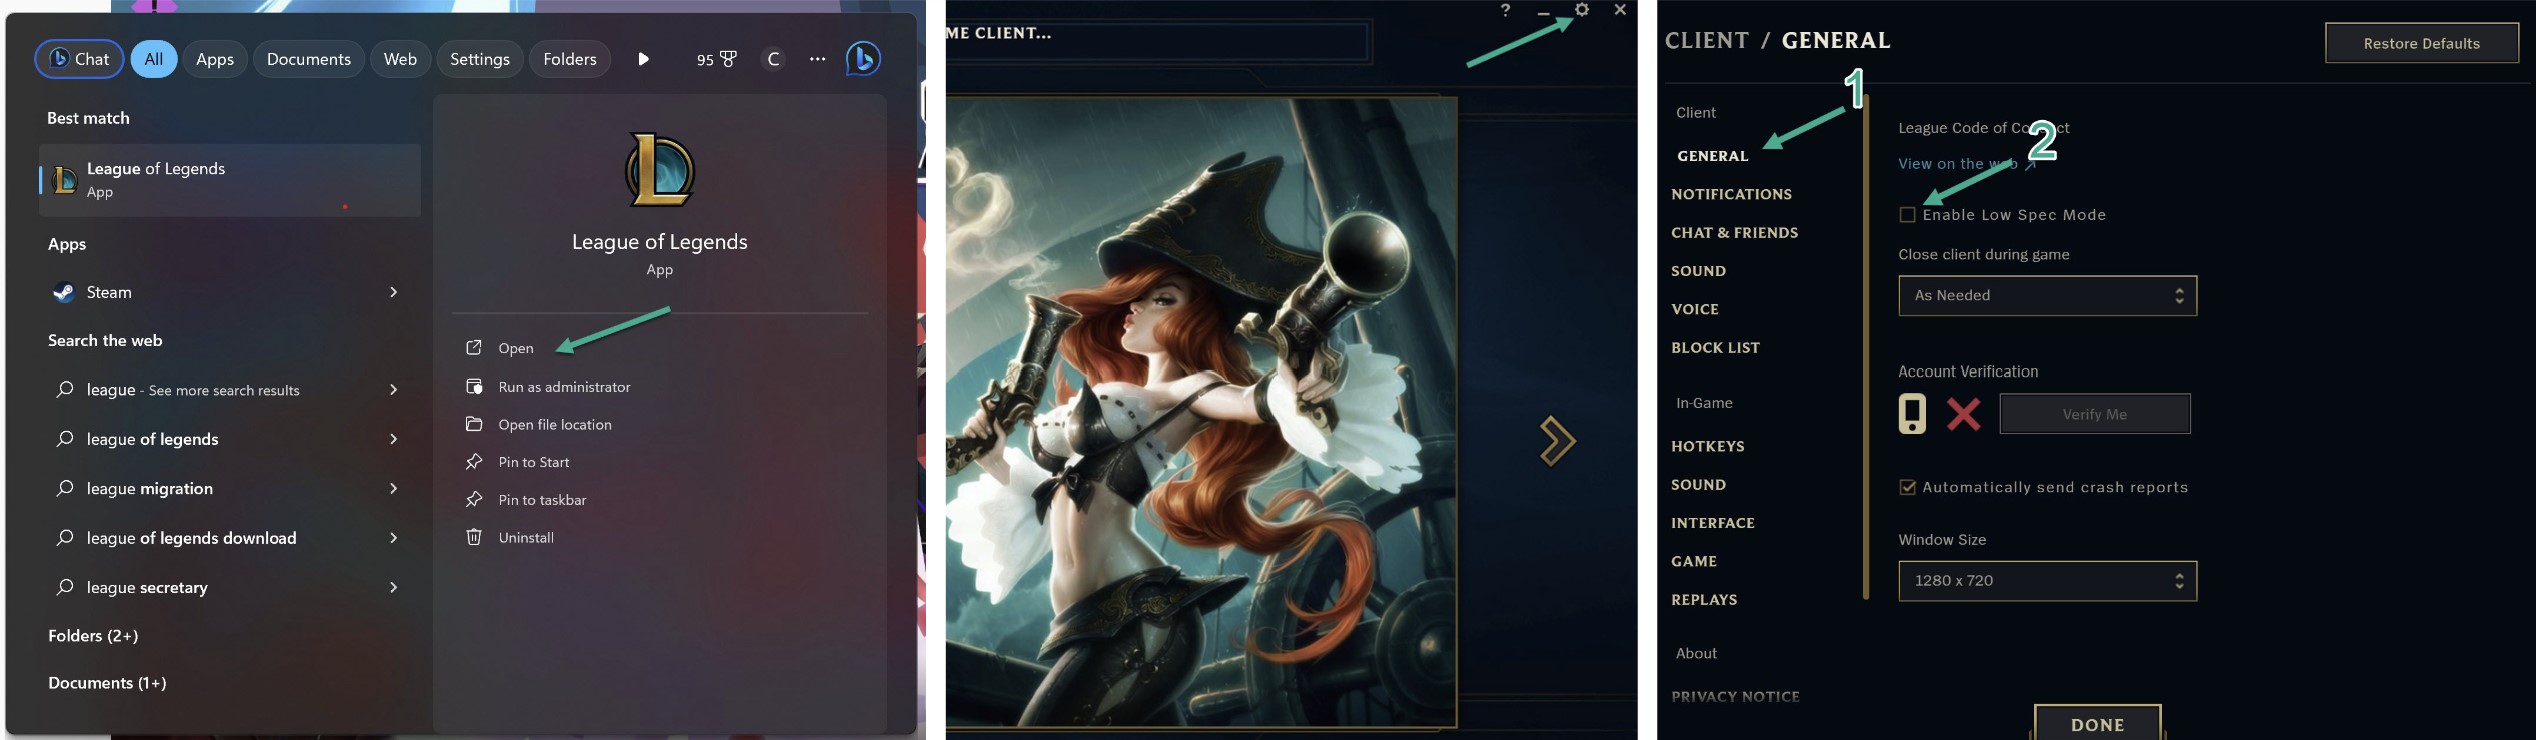
Adjust settings until you find an optimal balance between visuals and maximum FPS. This boosts performance and fixes lag.
3. Close Background Apps and Processes
Too many apps running simultaneously eats up RAM and CPU cycles needed for smooth League gameplay.
Use Task Manager to identify and close down memory-intensive background apps before launching the game. This frees up resources for League.
4. Install Latest Windows Updates
Outdated Windows builds can cause conflicts with games leading to technical issues.
Keep your Windows version updated using Windows Update. Game-related performance improvements and bug fixes in new updates/patches can resolve FPS drops.
5. Clean Install Latest GPU Drivers
Sometimes graphics drivers get corrupted while updating. Use Display Driver Uninstaller (DDU) to do a clean install:
- Download and run DDU
- Select your GPU in DDU and press “Clean and Restart”
- Boot into Safe Mode
- Run DDU again and reinstall latest GPU drivers
This process wipes out all driver remnants before a fresh install, fixing conflict issues.
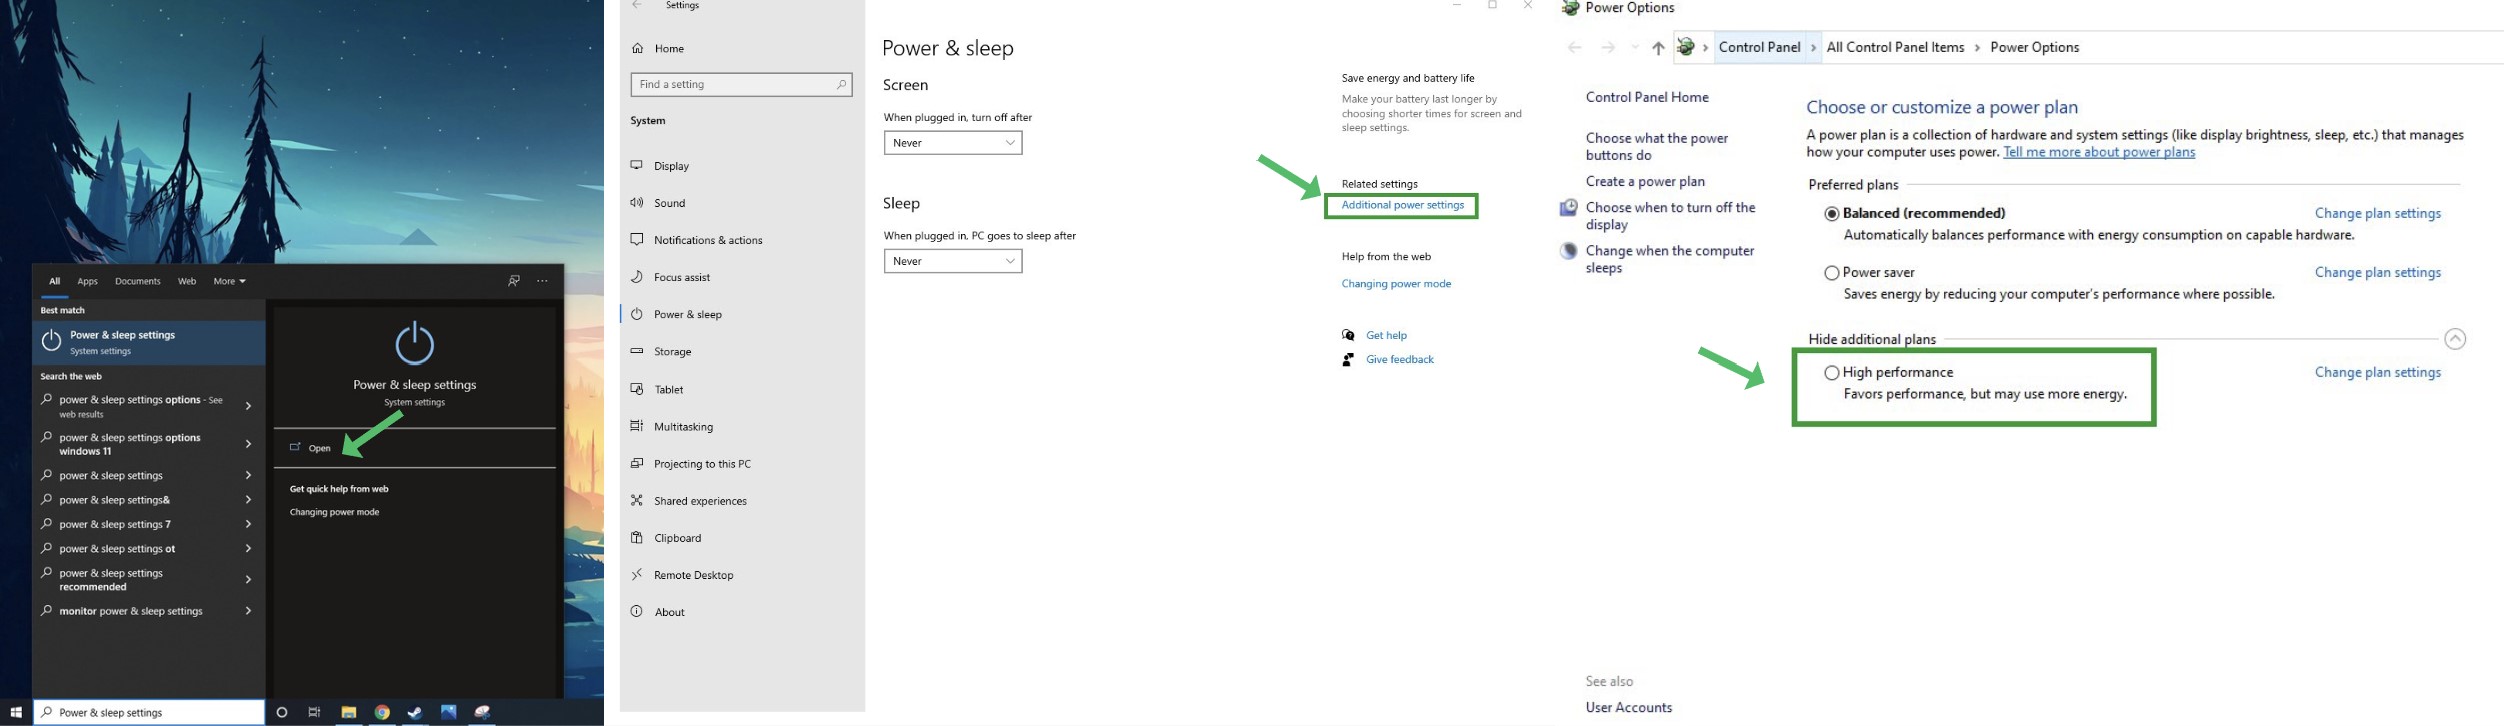
6. Optimize Windows for Gaming
Making a few tweaks to Windows settings can boost gaming performance:
- Search for “Choose power plan” and set to High Performance
- Disable Game Bar, Game DVR, Game Mode
- Turn off VSync, Hags, Graphic enhancements
- Run Windows Memory Diagnostic and Disk Defragmenter
These steps reduce background activities and prioritize system resources for gameplay.
7. Repair/Reinstall League of Legends
If the problem persists, corrupted game files could be the culprit. You can either:
- Open Riot Client > Click the Profile Icon in the upper right corner > Select Settings > Select League of Legends then Repair

OR
- Uninstall and delete League completely using Revo Uninstaller
- Restart your PC
- Reinstall League of Legends fresh using the official website
This will replace all missing/corrupted game files and components that might be causing FPS issues.
Optimal FPS for League of Legends
Ideally, you should target 60 FPS for smooth League gameplay. Some expert players recommend capping in-game FPS to your monitor’s refresh rate for optimal visuals and response time.
For example, on a 144Hz monitor, limit FPS to 144. Anything above won’t be noticeable, so it’s pointless overworking your hardware.
The key is to find a sweet spot between graphics fidelity and high FPS that works for your system’s capabilities.
Final Thoughts on League of Legends FPS Drop
FPS drops during intense League of Legends matches can ruin the entire experience. Fortunately, this comprehensive troubleshooting guide equips you with all the tools to banish lag and unblock high FPS.
The key steps are optimizing in-game settings, updating graphics drivers, closing background apps, repairing game files, and boosting overall system performance for gaming.
Implement these tips and you’ll once again enjoy buttery-smooth gameplay with your favorite League champions. Just don’t blame lag when you lose your next ranked match!