Windows 10 Goes To Sleep After 2 Minutes? 6 Easy Fixes to Stay Awake
Experiencing the issue of Windows 10 going to sleep after just 2 minutes? This frustrating problem can disrupt your workflow and interrupt tasks. In this troubleshooting guide, we will provide effective troubleshooting solutions that you can do to resolve this issue, allowing you to extend the sleep timer and regain control over your Windows 10 system.
Fix Windows 10 Goes To Sleep After 2 Minutes
1. Adjust Power and Sleep Settings
The first step in troubleshooting Windows 10 going to sleep after 2 minutes is to adjust your power and sleep settings. You can completely disable sleep mode through the Power & Sleep Settings menu. By tweaking options like “Put the computer to sleep” and “System unattended sleep timeout”, you can prevent your PC from going to sleep automatically after just a couple minutes of inactivity.
Here’s how:
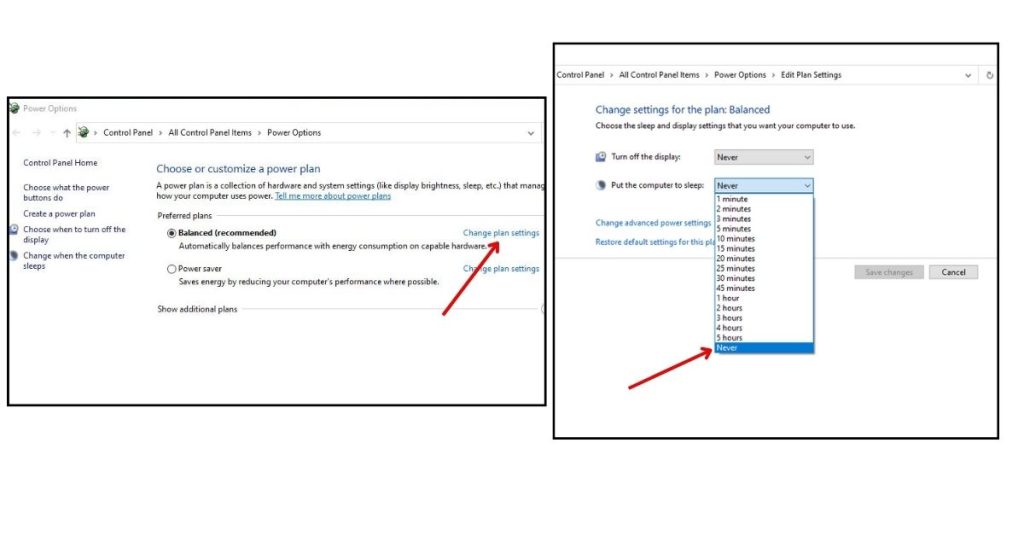
- Open the Power & Sleep Settings menu by pressing Windows Key + R and typing “powercfg.cpl” without quotes.
- Click on “Change plan settings” next to your current power plan.
- Change the “Put the computer to sleep” to Never.
- Click the “Change advanced power settings” and then expand the Sleep section.
- Change “Sleep after” to Never.
- Click Apply to save the changes.
This will completely disable sleep mode and prevent your PC from going to sleep automatically after 2 minutes or any other time period.
2. Run the Power Troubleshooter
Another option is to run the built-in Power Troubleshooter in Windows 10. This troubleshooter is designed to scan your system for any power-related problems and fix them automatically. It can detect and resolve glitches that may be causing your PC to go to sleep after 2 minutes. After running the troubleshooter, restart your computer and check if Windows 10 goes to sleep after 2 minutes issue is fixed.
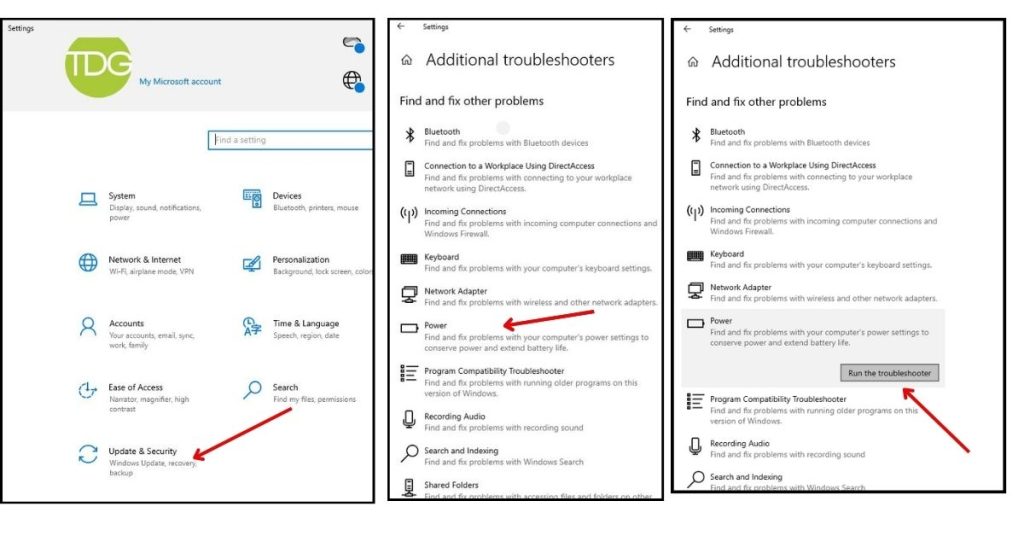
To run it:
- Go to Settings > Update & Security > Troubleshoot.
- Click on Power then “Run the troubleshooter.”
- Restart your PC after it completes.
The troubleshooter will scan for power-related problems and attempt to resolve them automatically.
3. Modify the Power Button Setting
If you’re using a laptop with an external display, the power button settings may be forcing it to sleep.
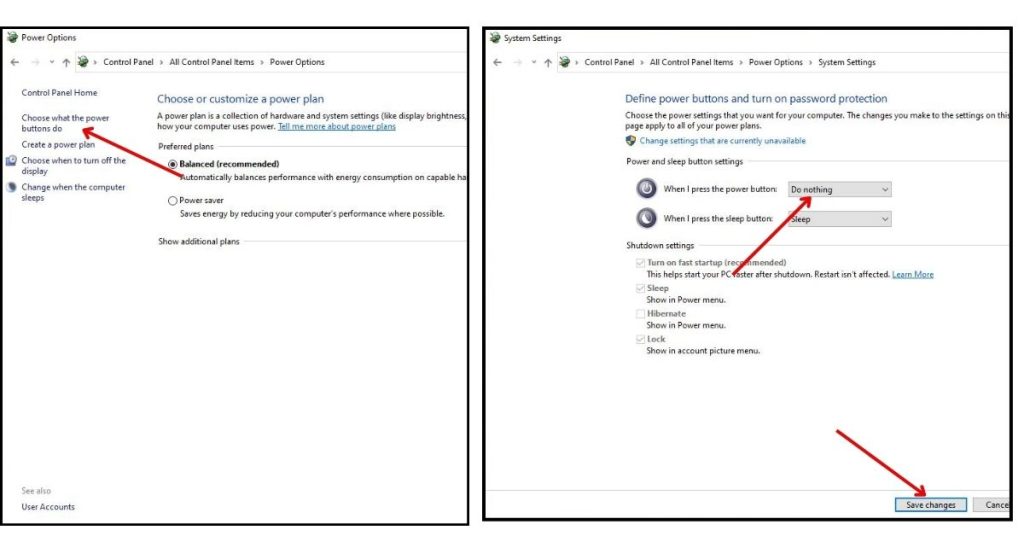
To adjust this:
- Open Power Options (from Control Panel) and click “Choose what the power button does” on the left.
- Change “When I press the power button” to “Do nothing” for both battery and plugged in.
- Click Save Changes.
Now pressing the power button won’t make your laptop sleep right away.
4. Check for Hardware Issues
Sometimes external devices connected via USB can cause sleep issues due to power management features or driver problems.
Try unplugging any USB devices you don’t need and see if the problem persists. Updating drivers for wireless mice, keyboards, and other USB accessories can also help.
If the issue started after connecting a new device, that device may not be fully compatible with Windows 10.
5. Reset Your Power Plan
Resetting your currently active power plan’s settings to default values can correct problems caused by corrupted sleep settings.

To do this:
- Open Power Options and click “Change plan settings.”
- Click “Restore default settings for this plan.”
- Confirm you want to reset the plan.
Your power settings will now be restored to their original defaults, which should prevent the 2 minute sleep problem.
6. Update Windows
Microsoft releases continuous updates for Windows 10 to fix bugs, improve performance, and enhance stability. Install the latest updates if available.
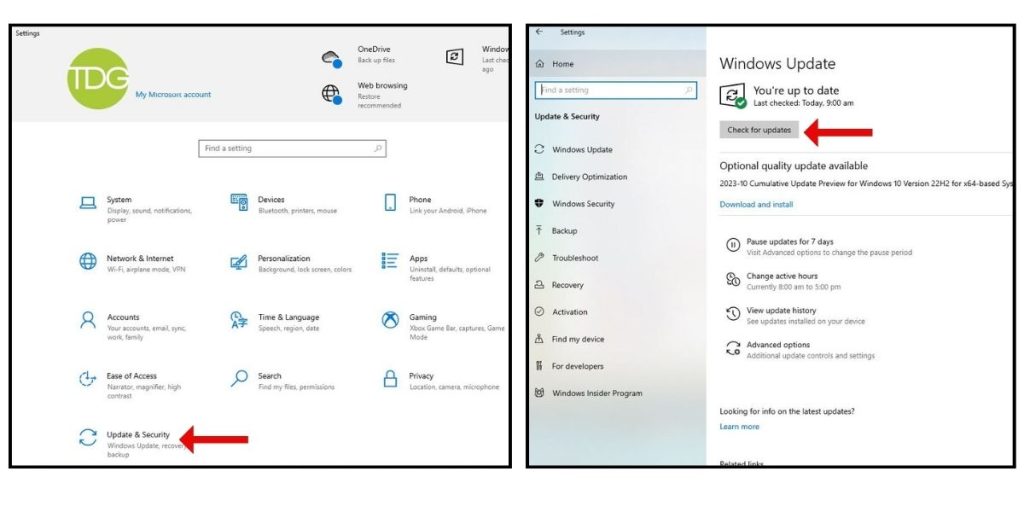
- Go to Settings > Windows Update.
- Click on “Check for updates.”
- Restart your PC to install any available updates.
Updating Windows can often resolve odd system behaviors like Windows 10 goes to sleep after 2 minutes.